If your building an AIR application and you want to have your own native custom file type association for your app, it is surprisingly easy to to with ActionScript 3 in air as I found out. I was unable to find any information on reading and writing custom files so I decided to post my experience here. I remembered watching a tutorial by Lee Brimelow at gotoAndLearn a while back where he showed how to decode a BMP file using ByteArrays. So I revised the tutorial and used the ideas from this to create my own file.
For this example I will create a simple graphic file containing some metadata and some bitmap data.
1. Write out the specification
The first thing you should do is map out a spec sheet for it, outlining all the data and datatypes you want to store and the order it will be written. This is important so you don’t forget later on, and if you want others to be able to use it as well. Your custom file must be read and written in the same order. I just did it in Notepad like so:
image name - String
image author - String
image width - int
image height - int
bitmapdata length - int
bitmapdata - bytearray
Note that this is a very basic file, so you could save all different data types such as Boolean, Number, String, int, uint etc.
2. Get your data into a ByteArray
To write the file first we need to create a bytearray and then using the write methods of the ByteArray class write the bits of data to it:
// the stuff we want to save - name, author and a bitmap - in this case I've created a red square 300x300px
var name:String = "a new picture";
var author:String = "Ted Mosby";
var bitmap:Bitmap = new Bitmap(new BitmapData(300,300,false,0xFF0000));

// convert bitmap to byte array
var bitmapBA:ByteArray = bitmap.bitmapData.getPixels();

// create a bytearray to save into file
var bytearray:ByteArray = new ByteArray();

// write the image name
bytearray.writeUTF(name);

// write author
bytearray.writeUTF(author);

// write image width and height
bytearray.writeInt(bitmap.width);
bytearray.writeInt(bitmap.height);

// write bitmap data length
bytearray.writeInt(bitmapBA.length);

// write the bitmap
bytearray.writeBytes(bitmapBA);
3. Write the file
Now that everything has been put into a ByteArray we can create a File object and save it to the hard drive.
// set a file extension - could be what ever you want it to be
var extension:String = ".abc";

// create the file on the desktop
var myFile:File = File.desktopDirectory.resolvePath("image" + extension);

// create a FileStream to write the file
var fs:FileStream = new FileStream();

// add a listener so you know when its finished saving
fs.addEventListener(Event.CLOSE, fileWritten);

// open the file
fs.openAsync(myFile, FileMode.WRITE);

// write the bytearray to it
fs.writeBytes(bytearray);

// close the file
fs.close();

function fileWritten(e:Event):void
{
   trace("File Saved to Desktop");
}
4. Reading the file
And thats it for saving your own file types. For reading them it is pretty much the opposite of what we just did but using read methods of the File API instead of the write ones. For this example a file browse window will be initiated so the user can select a file and then load it in:
// create variables to hold the file data
var name:String;
var author:String;
var width:int;
var height:int;
var bmLength:int;;
var bitmapBA:ByteArray;
var bitmapData:BitmapData;
var bitmap:Bitmap;

// create a file reference
var fr:FileReferance = new FileReference();

//add events to FileReference for file select, and ready to open
fr.addEventListener( Event.SELECT, selectFile);
fr.addEventListener( Event.COMPLETE, readyToOpen);

// create a file filter so the browse window only shows our custom file type
var f:FileFilter = new FileFilter("Custom File (*.abc)", "*.abc");

// initiate the browse window
fr.browse([f]);

// this event is fired when the user selects a file
function selectFile(e:Event):void
{
  // load the selected file
  fr.load();
}

// this event is fired when the file has finished loading
function readyToOpen(e:Event):void
{
  // pass the file's bytearray to the function below to read the data
  loadFile(fr.data);
}

function loadFile(ba:ByteArray):void
{
  // read the name
  name = ba.readUTF();

  // read the author
  author = ba.readUTF();

  // read the bitmap with and height
  width = ba.readInt();
  height = ba.readInt();

  // read the bitmapdata length
  bmLength = ba.readInt();

  // read the bitmapdata bytearray
  bitmapBA = new ByteArray();
  ba.readBytes(bitmapdata, 0, bmLength);

  // set the pixels of a bitmap from the loaded bitmapdata bytearray
  bitmapData = new BitmapData(width, height);
  bitmapData.setPixels(bitmapBA);

  bitmap = new Bitmap(bitmapData);
}
5. Setting up Flash CS5 to associate the file type with your application
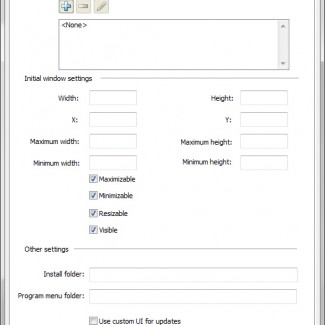
With Flash open, open up the AIR settings panel by going to File > AIR Settings and then go to the advanced tab:
(click to enlarge)
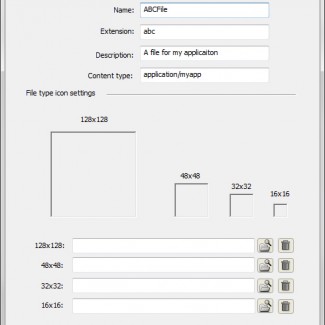
Click the + button under associated file types to add our file type, a window will popup where you can enter the file extension, icons and other information about the file type:
(click to enlarge)
Click OK to add the file association and then OK to close the AIR settings window. Now when the application is published and installed the custom file type will be associated with your app and be given the icon you defined in the AIR settings. To take this even further you can register InvokeEvents in your app so you custom files can lauch your app.
Good Luck.


You must be logged in to post a comment.